Apple Cider Vinegar

Apple Cider Vinegar also contains malic acid which acts in a similar way to lower pH levels in the gut. This stimulates appetite and improves the digestive process. Potassium assists in helping maximum nutrition to be obtained from the feed – particularly the absorption of calcium which is very important for growing chicks and laying hens.

Organisms in the gut can affect the health of chickens and compete with them for nutrition. By lowering the pH in the gut beyond that in which a specific organism can survive, the organism is eradicated. This has been demonstrated to be effective with control of pathogens such as Salmonella*, coccidiosis oocysts and internal parasites.

Apple Cider Vinegar is best given as an additive to drinking water. It can be fed to any age of bird. There are several methods of adding the vinegar to the water, they are all effective and can be adapted to suit your own requirements or regime.

The most effective sort of Apple Cider Vinegar to use is cold pressed and unfiltered as it retains more of its essential and effective vitamins and minerals.

Cautions: Do not use metal water dishes, except stainless steel – plastic is preferred. Do not use on birds which you already suspect of having excessive internal inflammation or irritation.

Two methods of giving Apple Cider Vinegar are described here. They are both effective but it is probably best to stick to one method once you decide which to follow.

Method 1 – 25ml of Apple Cider to be added to 1 litre of drinking water which is given to the hens for a period of 10-14 days to adjust pH and establish healthy gut flora. Followed by maintenance periods of either 2 days a week (the weekend for example) or one week per month. (That is a ratio of 40:1)

Method 2 – 1 ml per litre of water given on a constant basis – this is very effective for rearing chicks and growers to 8 weeks or so.
The Chicken Embryo

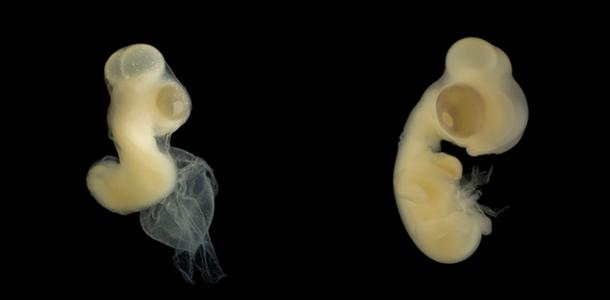
Chicken Embryo Fig 1


Gallus gallus

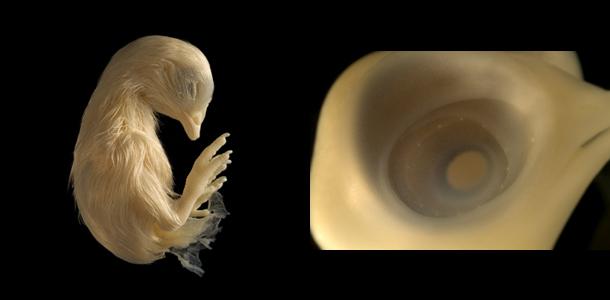
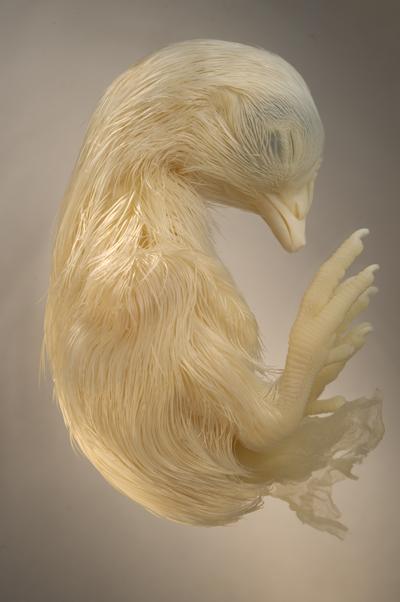
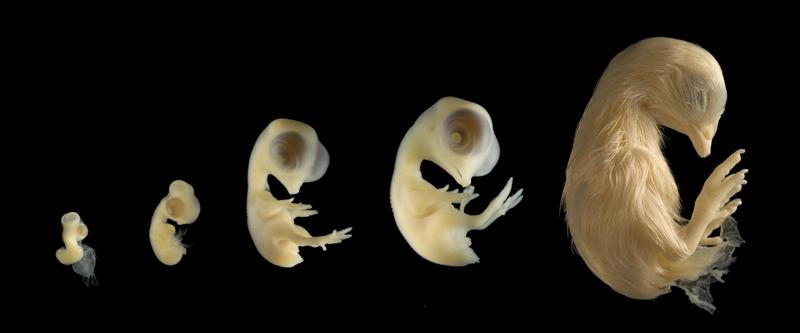
The Chicken embryo is a staple educational tool in developmental biology. Their availability and similarities with mammalian embryo, help shape our present understanding of embryology. After 21 days of incubation, the chick attempts to break out of its shell, pushing its beak through the air cell. Since the specimens were received out of the egg and without its yoke, I lacked the ability to document the chicken’s interaction in its element. The specimens document a range from 5, 6, 9, 12, to 18 days of development.

Chicken Embryo Fig 2

PHOTOGRAPHING THE EMBRYO


SUPPLIES
Camera
Two sets of fiber optic lights
Glass cell approx. 5″x5″
Water that has sat out in the open for 1 day
Black velvet fabric large enough to cover the bottom of the glass cell.

PROCEDURES

The chicken embryo is a semi-transparent and monotone subject. The transparent flesh lends itself well to back light, which causes the skin to appear to glow. The choice of background is a crucial prop that helps determine the success of the image for its application. For scientific and documentation purposes, black is the best choice to contrast the flesh tone embryo and emphasize its subtle details. Using a white background makes the translucent skin difficult to distinguish between the subject and its background. However, done correctly, a white background can produce an aesthetically pleasing photo, articulating its neutral tones.

The chicken embryo if filled with fluids. If taken out of the water, its delicate cavities will collapse, loosing the significance of its bodily form. Photographing the embryo through water maintains its structure. A second advantage of photographing the embryo under water removes any specular highlights while diffusing the light that falls on the subject. However, the diffusion does reduce the contrast. Bumping up the contrast either through the lighting technique or through the digital file will be helpful.

In the same way that air bubbles form on the sides of an open bottle of water, bubbles will form on the embryonic body. This produces unpleasant artifacts on your image. To reduce this issue, let the water sit out for a day so the gas in the water have a chance to escape. If the bubbles still remain on your subject, try shaking it off, otherwise as a final attempt, they can be removed through Photoshop. Fill the cell with water so it just covers the embryo. Too much water and the embryo will float around uncontrollably. Too little water and unwanted specular highlights will show up on its wet surface.

Place the glass cell on top of the black velvet. Black velvet produces a rich black background. Set the fiber optic lights at the bottom of the cell on two opposite sides of the cell. My lighting ratio was at 1:2. One light shining towards the front of the embryo and the other shining on the back. The head of the chicken is usually the main focus point. Let the brighter light shine on the anterior body. Placing the lights at the very bottom of the cell allows the light to shine across and through the transparent embryo, creating a glow on its edges. The side lighting also forms shadows on the embryo, emphasizing its bulbous eyes and porous skin.

Chicken embryos are a fascinating subject both on a scientific level and aesthetical level. The continual observation and documentation of chick embryo helps to educate the development of organisms generate and are manipulated.


Chicken Embryo Fig 4

. ……………………………….                    DAY 5
Reproductive organs begin to form
The bones of the legs & the crop
begin to develop.
………………………………                DAY 6
Wing is bent at the elbow
The beak is more prominent
No egg tooth is visible yet

Chicken Embryo Fig 5

…………………………..                         10 DAY
The distal segments of limbs are longer
Nostril is a narrow slit
Flight feathers are noticeable
Lower eyelid has grown up to level of cornea
Circumference of lids is a narrowing ellipse
………                         12 DAY
Primary scales form over entire surface of leg
Feather germs surround auditory opening
Upper eyelid is covered with feather germs
Lower eyelid covers 2/3 to 3/4 of cornea

Chicken Embryo Fig 6

18 DAY   –    Beak length-4.8mm   –   Third toe length-16.7mm

Facts sheet reference: http://www.rit.edu/~gtfsbi/genbiol/chicklab.htm
PHOTOGRAPHY & COPY PRODUCED BY MICHELLE LEUNG –

contact  –  michelleleung8@gmail.com


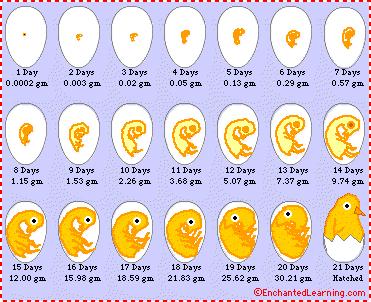
Egg and Embryo Development

Chicken Embryo Fig 8


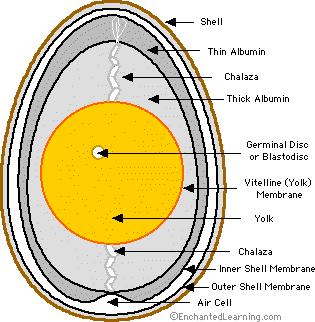
Cross Section of a Newly Laid Egg

Chicken Embryo Fig 7

The Formation of an Egg:

The Yolk: The chicken egg starts as an egg yolk inside a hen. A yolk (called an oocyte at this point) is produced by the hen’s ovary in a process called ovulation.

Fertilization: The yolk is released into the oviduct (a long, spiraling tube in the hen’s reproductive system), where it can be fertilized internally (inside the hen) by a sperm.

The Egg White (albumin): The yolk continues down the oviduct (whether or not it is fertilized) and is covered with a membrane (called the vitelline membrane), structural fibers, and layers of albumin (the egg white). This part of the oviduct is called the magnus.

The Chalazae: As the egg goes down through the oviduct, it is continually rotating within the spiraling tube. This movement twists the structural fibers (called the chalazae), which form rope-like strands that anchor the yolk in the thick egg white. There are two chalazae anchoring each yolk, on opposite ends of the egg.

The Eggshell: The eggshell is deposited around the egg in the lower part of the oviduct of the hen, just before it is laid. The shell is made of calcite, a crystalline form of calcium carbonate.
This entire trip through the oviduct takes about one day.

Growth of the Embryo: The fertilized blastodisc (now called the blastoderm) grows and becomes the embryo. As the embryo grows, its primary food source is the yolk. Waste products (like urea) collect in a sack called the allantois. The exchange of oxygen and carbon dioxide gas occurs through the eggshell; the chorion lines the inside surface of the egg and is connected to the blood vessels of the embryo.

The Incubation Period: The embryo develops inside the egg for 21 days (the incubation period), until a chick pecks its way out of its eggshell and is hatched.

Definitions:

Air Cell – an empty space located at the large end of the egg, it is between the inner and outer shell membranes.

Chalaza – a spiral, rope-like strand that anchors the yolk in the thick egg white. There are two chalazae anchoring each yolk, one on the top and one on the bottom. (The plural of chalaza is chalazae.)

Germinal Disc or Blastodisc – a small, circular, white spot (2-3 mm across) on the surface of the yolk, it is where the sperm enters the egg. The nucleus of the egg is in the blastodisc.

Inner Shell Membrane – the thin membrane located between the outer shell membrane and the albumin.

Outer Shell Membrane – the thin membrane located just inside the shell.

Shell – the hard, protective coating of the egg. It is semi-permeable; it lets gas exchange occur, but keeps other substances from entering the egg. The shell is made of calcium carbonate.

Thick Albumin – the stringy part of the egg white (albumin) located nearest the yolk.

Thin Albumin – the watery part of the egg white (albumin) located farthest from the yolk.

Vitelline (yolk) Membrane – the membrane that surrounds the yolk.

Yolk – the yellow, inner part of the egg where the embryo will form. The yolk contains the food that will nourish the embryo as it grows.

http://www.microscopy-uk.org.uk/mag/artnov04macro/mlchicken.html

Tips on Showing Poultry

This article is from MonarchzMan at Backyard Chickens

Tips on Showing Poultry

“I am Absolutely Sure…(I think)”

Alright, here’s a general timeline for preparing a bird for show. This is the method that I use, and it’s done a good job, but there are certainly more methods out there. This also is a GENERAL method. There are some specifics that need to be done for different breeds, so if you want more specific answers about your breed, just ask.

First, an unhealthy bird never shows well, so you want to be sure that you have your bird protected against disease and parasites. Vaccinations and other preventatives help this. They should be done on a regular basis. Parasites tend to be more of a problem, however, so make sure that you worm your birds and get rid of any external parasites, like lice and mites. It is the responsible thing to show a healthy bird, not only for your bird, but for the other breeders. Showing a bird can stress the bird, and for an unhealthy bird, that could be fatal. And other breeders don’t want their birds to catch any diseases. You also want to make sure that they’re tested. Most shows ask that all birds be tested for pullorum, but there probably are shows that ask for more than just pullorum, so be sure to check on that. And DO NOT DUST birds for lice before you get them tested for pullorum (like immediately before), this will cause false positives and will cause you a whole lot of headaches. This is probably the most important thing in showing poultry.

Second, diet. Now, there are many people out there who will create their own feeds that they believe will make the best bird. Personally, I just use the commercial feeds. For instance, Purina’s Gamebird Flight Conditioner is good for getting birds to grow in strong, healthy feathers quicker. If you want to add supplements, then that is your choice. A lot of these companies research these sort of things to make the best feed, so personally, I just go with them. I will, however, occasionally give my birds black oil sunflower seeds. This makes them very shiny, which is appealing to a judge. You have to be careful about how much you give them just because the sunflower seeds are high in protein and you don’t want to get fat birds. As a general trend, birds that are in production (laying), lose their luster. Their feathers become duller and the colour in their legs fade. It’s more obvious on some breeds than in others. Also, generally, you don’t want to feed your birds a lot of corn (the less the better, generally). This is because corn can cause brassiness in white feathers, that is, it can turn feathers yellow. Genetics play a role in this too. White birds lacking the silver gene can get brassy, oftentimes from the sun. The sun will fade or alter feather colour, so you want to keep them in a spot where they’re not in the sun a lot(though, they do need sun to get vitamin D, just like us).

Alright, now I will get into the specific timeline on preparing a bird for show.

8-12 weeks before the show, you want to pull any broken feathers. That is, broken wing feathers, tail feathers, and body feathers. It is especially important to pull the tail feathers and wing feathers at this time because they take a long time to grow in, and in many breeds, there are a specific number of each, so you want all of the feathers to be completely grown in. It takes a feathers 6-8 weeks to complete grown back, this just give them plenty of time. On turkeys, its a little longer, which would make sense, longer, larger feathers take longer to grow in. It is at this point that it would be a good idea to isolate the bird because many times, broken feathers are caused by other birds. You also want any wounds that the bird may have to heal completely. You want the feathers completely grown in. The judge won’t knock points off for partially grown in feathers, but when he has to compare a bird with completely grown in feathers and partially grown in feathers, he’s going to choose the one that’s in condition (completely grown in).

4 weeks before the show, you want to do any trimming that is necessary. Trim beaks, toenails, and spurs (on males). On both you don’t want to go past the translucent part (it’s more difficult to tell that on the dark nailed and beaked birds, so you have to get a feel for it). You can just use regular nail clippers for this. What I usually do in take of a little bit at a time, so if I do draw blood, it won’t be terrible. You want to do this around this time just so it is enough time for the bird to smooth the edges so that it looks more natural. The judge won’t count points off if you just trimmed the day before the show, but he will choose a bird that looks natural. It is general courtesy to the judge not to have your males have daggers on their legs, so keep the spurs dull. The trimming of the beak is vital to a bird’s health. Too long of a beak can cause the bird to have difficulty eating, and they can actually starve to death.

1 week before the show. This would be a good time to give birds their first baths. Now a lot of people don’t have time to give birds multiple baths, but it helps. At this time, you can work off most of the dirt and manure that may be stuck to the feathers. For these baths, I recommend using human shampoo. If it is good for you, it is good for them. I try to stay away from de-greaser soaps because that can remove most of the oils on their skin, and as a result, you’ll have a frizzled bird, which isn’t good. If the soap leaves your hands dry and chalky (I guess that’d be the word), then it will do the same for the bird. Usually what I do is set up two tubs of warm water. One with soap in it and the other with rinse water, to get rid of any soap from the soap water. Now if you have a white bird, you can use bluing (http://en.wikipedia.org/wiki/Bluing) in a third tub, but you want to use a VERY LITTLE BIT. Only a few drops per several gallons. This will help make the bird whiter, but if you use too much bluing, well, you’re going to end up with a blue bird.

3-4 days before the show. Give them their second bath. I doubt that any chicken will stay clean for more than a couple of days, so this bath is just as a rinsing, really. To get anything that you missed. For drying the birds, you can use one of two methods. You can let them air dry or you can blow dry them. In both cases, you want to towel off any access water. For the air dry, put them in a cage with a heat lamp. For this method, it take 24 hours to completely dry, so plan accordingly. For the blow drying, it’s a lot faster, obviously. For your more poofy birds, like Silkies and Cochins, this would be the better option because it tends to leave the birds poofier. But with your hard feathered birds, like OEGs, air drying would probably be a better option. On the blow drying, you have to be very careful about not overheating the bird. Do not pinch their wings together (birds cannot sweat, so the will spread their wings to release excess heat). If they start panting, give them a break. After the wash, put them in a clean cage which fresh shavings. This allows then to stay clean for the maximum amount of time.

Day of the show. When you go to a show, you’ll notice a lot of people frantically working on their birds. They’re doing several things to their birds. On their combs, earlobes, beaks, wattles, and shanks (legs), they’re applying one of a variety of things. More common things are VetRx, Vaseline, and baby oil. These will make those surfaces more shiny, and bring out the colour in the faces, especially. On all of them, you want to apply a THIN coat. Birds also release heat through those surfaces, so you don’t want to hinder that by clogging the pores. VetRx is especially good because it helps the bird fight off disease and such that it might come in contact with at the show. You can also help shine up their feathers by taking rubbing alcohol and a piece of silk and dabbing the silk in the alcohol and run the rag along the feathers. The feathers are very oily, and dust will stick to them, this method removes the dust, and the rubbing alcohol will evaporate quickly, so you aren’t left with a wet bird. Then you also want to do the general cleaning, clean the feathers and feet of any dirt or manure. If you go around the show, you may notice a lot of birds have coloured water to drink. This is usually electrolytes to help them fight off the stress of the show. You can get these mixes from most poultry equipment suppliers. It would not be a bad idea to bring your own water to the show either. Some birds are finicky about such changes, and if you’re going from well water to city water, the birds may not like that. Few shows provide food for the birds, so it is often up to the breeder to bring food. You do not want to feed your bird until after it is judged. Birds store food in their crops, and it can create a lump in their chest, that makes the bird look disfigured. Not to mention that if the bird is flipped upside-down by the judge, the judge will wear whatever was in the bird’s crop. Now, if it is a long show, you can give them enough to scratch at, but not a lot.

And finally, now this is the most important part on the day of the show. Relax and have fun. Don’t go expecting to win because you cannot control that. You can, however, control the good time that you have. Meet other breeders, look at other birds, buy other birds (possibly the greatest hobby at these shows), get tips for other breeders. Most breeders are happy to help someone getting into the fancy, and you’re never too old to learn a new trick. I’ve been showing for 2 years now, and I’m still learning tips and tricks with my breeds.
If other show persons have tips and tricks that I missed, feel free to share them, after all, this isn’t the only method for showing, this is just the method that I use.

Parasite Control in Poultry

Parasite Control in Poultry

By Dr Colin Walker BSc, BVSc, MRCVS, MACVSc (Avian health)

Parasites of concern in poultry are roundworm, hairworm and tapeworm, Coccidia and lice and mites. Worms are extremely common, particularly in free-range poultry. Being a primary parasite, they drain the birds of nutrition, causing ill-thrift, a general failure to thrive, a vulnerability to other diseases, and, in severe infections, death. Both roundworm and hairworm have what is called a direct life cycle in that the eggs are passed in the droppings and after a period of time in the environment, become infective. New birds become infected by inadvertently eating these eggs while feeding, drinking or scratching around their yard. Once an egg is swallowed, it hatches and eventually matures into a new worm in the bird’s bowel.

In roundworms, the life cycle is particularly short, being only 21 days. This means that if a chicken is wormed and swallows an infective egg the very next day, in only 3 weeks that chicken will have mature roundworms in its bowel again. To completely eradicate roundworms from a flock involves worming the birds every 3 weeks and each time following up with a particularly thorough clean of the yard. Ongoing hygiene is particularly important because any dropping passed prior to worming will contain worm eggs that have the potential to reinfect the chicken. Often in a free-range situation, no matter how thoroughly one cleans, it is not possible to completely remove every piece of dropping and so some reinfection does occur. In this situation, regular worming is done, not so much to eradicate any parasites but rather to keep them at a low level where they are not causing clinical disease. Often here, in a yard that is basically clean, worming every 3 months will provide adequate control. There are many medications on the market to worm birds, but the one I recommend is Moxidectin. It provides good clearance of roundworms and hairworms, is very safe and easy to administer, and has the handy side effect of killing any external parasites that feed off body fluids. This includes all mites. The dose of Moxidectin 2 mg/ml for the flock is 5 ml to 1 litre of water for 24 hours. This dose is based on normal water consumption. If for one reason or another the birds’ water intake on that day is low, the drug is safe enough to provide for a second or a third day to ensure that all birds receive an adequate amount. If some birds receive a double or triple dose, this will do them no harm. It is important that the water containing the Moxidectin is mixed freshly each day, however, and that, of course, no other water sources are available. Moxidectin can also be given to individual birds at the dose of ½ ml per kg as a single dose orally.

Tapeworms have a more involved life cycle. The adults, which live in the bowel, pass packets of eggs in the droppings that need to be eaten by an insect to become infective. Chickens can only become infected by eating insects carrying the tapeworm larvae. It is often possible to tell if a chicken is infected by tapeworms simply by looking at the droppings. Tapeworm egg packets are visible to the naked eye and appear as white pellets stuck in the droppings. Most are about the size of a grain of rice but bigger and smaller types occur and sometimes rows of egg packets can be passed together, which appear as white ribbons in the dropping. The only way to reliably tell if a chicken has roundworms or hairwoms is through a microscopic examination of the dropping. The usual drug used to treat tapeworms is Praziquantel. This is available in a variety of tablets and syrups. I usually use the brand Prazivet, which is added to the water at the rate of 5 ml to 1 litre for 24 hours. Like Moxidectin, an individual bird can be treated with Prazivet by giving ½ ml of the neat solution per kilogram of body weight as a single dose.

Coccidia are protozoan organisms that live in the lining of the bowel. Infected birds are usually lethargic, underweight and have diarrhoea that can be blood tinged. The Coccidia eggs are released in the droppings and fresh chickens become infected by inadvertent ingestion of grain or water contaminated with these droppings. In a free-range situation, most chickens have a low-level ongoing exposure to Coccidia. Rather than make them sick, this stimulates the development of a strong natural immunity that keeps them healthy. Chickens become unwell with Coccidia in one of several situations, for example, where they are housed in dirty damp conditions that provide a high level of exposure to the organism, or where they become run down generally, in which case the Coccidia will multiply and cause disease. Alternatively, if chickens which have a low natural immunity to Coccidia suddenly come in contact with even moderate levels, then disease can occur. Coccidia is diagnosed through microscopic examination of a dropping sample. Often where Coccidia is diagnosed, it is important to review the general management and housing as flaws will often be found here. The drug I recommend to treat Coccidia is Baycox. This is used at the rate of 3 ml to 1 litre of water for 48 hours. Where a flock is having an ongoing problem, this treatment is usually repeated every 4 – 6 weeks until the birds develop a stronger natural immunity to this parasite, while all the time ensuring that the birds are generally well cared for and that their pen is kept clean and dry.

The two main external parasites of chickens are lice and mites. Red mite, in particular, seems ubiquitous in chickens and is a common cause of failure to thrive. Severe infections will kill, particularly young chickens due to anaemia and it is vital that management protocols are in place. Lice live off feather debris and cannot survive off the chicken. Mites, on the other hand, feed off body fluids and survive well in the environment. Only a small number of the mites infecting a chicken are found on the bird at any one time. Many live in the nooks and crannies around the pen. To treat lice is a simple matter. As they cannot survive off the bird, it is simply a matter of dipping all of the birds. Mites can be removed also by dipping, however, as mentioned earlier, Moxidectin can be used in the birds’ drinking water to kill mites on the bird at that time. With mite infestation, however, it is vital to also treat the pen at the same time otherwise reinfection quickly occurs. When treating the pen, it is scraped and cleaned out as normal but then an insecticide is misted onto the scraped surfaces and into the nooks and crannies. This is usually done on the morning of a warm day and when the pen is dry after a few hours, the birds are readmitted. The recommended insecticidal spray is Permethrin. This is available in a number of preparations but I find it easiest to use as a water-soluble liquid where it is diluted 10 – 20 ml/l. Permethrin is also the dip of choice in chickens. To prepare the dip, add the Permethrin at the same rate of 10 – 20 ml per litre of water and add also a wetting agent such as baby shampoo or a few shavings off a bar of soap. Ensure that the water is warm and dip the birds in the morning of a warm day so that they have a chance to dry before nightfall.

PROGRAM FOR PARASITE CONTROL IN FREE-RANGE CHICKENS

Moxidectin 2 mg/ml, 5 ml per litre of water for 24 hours every 3 months
Monitor the droppings for tapeworm segments and if observed give Prazivet 5 ml per litre of water for 24 hours.
If Coccidia is a problem, give Baycox 3 ml to 1 litre of water for 48 hours every 4 weeks as required
Dip all birds in Permethrin and any new introduced bird. Ensure that the pen is sprayed simultaneously.

Artificial Insemination of Poultry

Artificial Insemination of Poultry

John L. Skinner and Louis C. Arrington
from http://www.browneggblueegg.com/Article/ArtificialInseminationOfPoultry/ArtificialInseminationOfPoultry.html

North Central Regional Extension Publication #216
Sponsored by the Extension Services of Illinois, Indiana, Iowa, Kansas, Missouri, North Dakota, Ohio, and Wisconsin.
This publication is offered as a guide for poultry hobbyists, aviculturists and others who breed ornamental fowl and want to use techniques commercial poultry breeders, particularly those in the turkey industry, have perfected to improve fertility.

When to Use Artificial Insemination

Chicken breeders may be disappointed when their better birds fail to reproduce. The birds may not mate because of shyness, physical limitations, lack of interest or social incompatibility. Unsatisfactory nutrition, age of breeders, management conditions, egg collection and holding practices, and incubation procedures can also influence production.

If birds do not reproduce when other conditions are adequate, artificial insemination may be the answer. It is relatively simple and can be used for many kinds of birds, but it requires practice and the proper equipment. It cannot, however, overcome poor management practices, poor health, genetic lethals or differences; nor will it halt early embryonic deaths.

Artificial insemination is more an art than a science. The procedure is not highly technical, but basic knowledge and appreciation of the bird’s anatomy is necessary. Success depends largely on the patience and skill of the inseminator. Wild-bird and waterfowl breeders should practice first with some common poultry type; Cornish bantams would be an excellent choices.

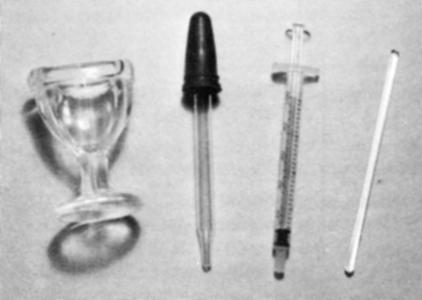
A I Fig 1 Equipment Figure 1.These simple tools – glass eye cup, medicine dropper, 1 cc plastic syringe and glass rod – are all that is needed for artificial insemination of poultry and other birds if an assistant is present.Equipment Needed
Artificial insemination equipment is simple. Figure 1 shows tools most often used when inseminating a small number of birds. Commercial operators may use more complicated equipment, including injection guns, collection aspirators and temperature-controlled semen containers.

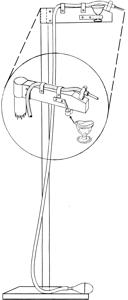
Figure 2 shows a one-operator stand useful for insemination. This stand lets one person collect semen and place it in the female. The male is held over the eye cup and the semen is discharged into it. The exposed oviduct of the female is placed over the glass tube which previously had semen placed in it. The operator depresses the rubber bulb with his foot to force the semen into the oviduct.

A I Fig 2 Equipment

The Male
For best results, the male used for artificial insemination:
1. Must be mature, healthy and physically normal
2. Must be sexually active. This is especially important in birds that have a limited season. Light stimulation may be used to control the season in some varieties.
3. Must be tame, or at least not terrified when restrained or handled.
4. Should be free from external parasites. Some parasites irritate the vent area, making male organ exposure difficult and painful to the bird.
5. Should be kept apart from, but preferably in sight of, females.
6. Should not be subjected to extreme temperatures or allowed to become overheated.

The Female
For best results, the female used for artificial insemination:
1. Must be in production, or she may be injured.
2. Must not have a hard-shelled egg in the lower part of her oviduct, so the sperm can move easily to the area where it unites with the ova.

A I Fig 3 Equipment

Procedure (Male)

Experts have developed several ways to hold males for semen collection. Techniques may require one or two persons.
The following two-operator method works well and reduces fright or feather damage to the bird.
Hold the male with his head toward the operator and with the keel lying in the palm of the left hand. Secure the right leg between the first and second fingers. To make larger birds more comfortable, hold the left leg between the second and third fingers.

Stroke the back from midpoint toward the tail with the right hand, massaging the abdomen from below with the fingers of the left hand. After several vigorous strokes, transfer the right hand from the back to a position where the thumb and forefinger can apply pressure to either side of the vent. Simultaneously, apply pressure to the abdomen with the fingers of the left hand.

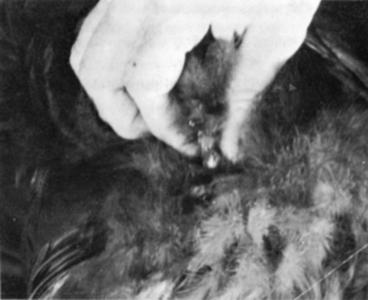
This normally extends the copulatory organ and causes a flow of semen, as shown in Figure 3. A slight milking action may increase semen flow. An assistant should catch the semen in an eyecup or other small smooth-edges vessel. In some instances, especially with waterfowl, the copulatory organ may not extend completely. Semen collection is still possible, however, as it flows over the surface of the partially everted vent.

Figure 3. Note position of the operator’s right hand. The white area between the thumb and forefinger is semen flowing from this male chicken.  

Points to Remember

• Stimulate males and collect semen immediately after catching. Holding a male, even a tame one, for only a few minutes may interfere with collection.
• Successful semen collection usually results from an experienced operator and an experienced subject.
• First attempts at “working” inexperienced males often produce unsatisfactory results. Some males pass feces or urates as they discharge semen. Try to collect only semen; contaminated semen usually produces poor results. Withhold water and feed four to six hours before collection to lessen chances for contamination.
• The volume of semen discharged varies from bird to bird. Most males produce between 0.1 cc and 0.44 cc during each successful collection.
• Individual males vary considerably in time needed to replenish their semen supply. Normally, however, you can collect semen every two to four days without harming the birds.
• Use the semen as soon as possible. It can be held one or two hours without great loss in fertilizing capacity, or longer under controlled conditions. Don’t allow the semen to dehydrate and keep it below the body temperature of the male that produced it.

Procedure (Female)
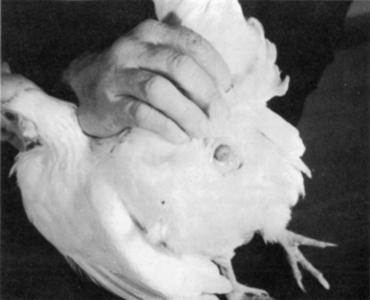
When handling and exposing the female, remember the hen is delicate and must be treated gently. Hold and stimulate her in much the same way as the male. As the operator applies pressure after the preliminary stroking and massage, the vent exerts and an orifice appears on the left side. It may be a round rosette or a cleft or skin overfold. This orifice, shown in Figure 4, is the oviduct’s terminal opening. An assistant should place the semen ¼ to 1 inch deep into this opening with a 1 cc syringe, a medicine dropper or similar device.
When making individual mating – one male with one female – use the entire semen collection. Various studies show, however, that good results can be achieved with as little as 0.05 cc of semen per insemination.
Relax pressure on the female’s body as soon as possible after insemination so the oviduct can return to its normal position, drawing the semen inward.
A I Fig 4 Equipment
  Figure 4. Note position of hands and the exposed terminal end of the oviduct of this female chicken.

Points to Remember

• How often insemination is needed for satisfactory results varies somewhat among females. It may be best to inseminate more often at the onset of production, but once some eggs have been fertilized, once-a-week insemination is enough to maintain a satisfactory level.
• Fertile eggs can normally be obtained 48 to 96 hours after insemination and up to three weeks thereafter. The percentage of fertile eggs from a flock begins to drop between five and seven days and usually will be unsatisfactory beyond 10 days.
• Turkeys remain fertile longer than some other birds. Geese show considerable individual variation.

A I Fig 5 Equipment

When to Consider Artificial Insemination

A I Fig 6 Equipment 1. To breed from birds of extreme body conformation, for example those with very broad bodies and/or short legs – conditions which hinder natural mating. The Cornish is an example of this type of bird.
2. To breed from birds with a lot of loose feathering so you won’t have to trim the feathers, e.g. Cochins.
3. To breed from injured birds, for example those whose toes have been frozen or wings or legs broken, etc.
4. To breed from older males when stiffened joints and other maladies of advanced age prevent natural mating.
5. To make better use of equipment. For example, with this method you can use one pen of females and one pen of males to secure several different mating combinations. You can also carry over unused males rather than having one pen for each mating.
6. To mate incompatible individuals.
7. One male can fertilize more females than with natural mating.
8. You can initiate fertility in several females at the same time. With natural mating, certain females may be unattended for several days.
9. Prevents over-active males from abusing females.
10. Prevents certain males from ignoring some females, as often happens under conditions of natural mating.
WW
For single copies of this and other North Central Regional Extension Publications, write to:
Publications Office, Cooperative Extension Service, in care of the University Listed on your left for your state. If you want information about ordering quantities of this or other Regional Publications, write or call the coordinating office for the NCR Educational Materials Project
B-10 Curtiss Hall
Iowa State University
Ames, Iowa 50011
515-294-8802.Programs and activities of the Cooperative Extension Service are available to all potential clientele without regard to race, color, sex, national origin, or handicap.
W
Sponsored by the Extension services of Illinois, Indiana, Iowa, Kansas, Missouri, North Dakota, Ohio, and Wisconsin, in cooperation with ES-USDA.This publication is available from your Wisconsin county Extension office or from:
Agricultural Bulletin Building
1535 Observatory Drive
Madison, Wisconsin 53706
608-262-3346
WW
In Cooperation with NCR Educational Materials ProjectIssued in furtherance of Cooperative Extension work, Acts of Congress of May 8 and June 30, 1914, in cooperation with the U.S. Department of Agriculture and Cooperative Extension Services of Illinois, Indiana, Iowa, Kansas, Michigan, Minnesota, Missouri, Nebraska, North Dakota, Ohio, and South Dakota. Charles F. Koval, Director, Cooperative Extension Service, University of Wisconsin, Madison, Wisconsin 5370
WW
John l. Skinner is Professor, Department of Poultry Science, College of Agricultural and Life Sciences, University of Wisconsin-Madison and poultry and small-animal specialist, Cooperative Extension Service, University of Wisconsin-Extension.Louis C. Arrington is professor, Department of Poultry Science, College of Agricultural and Life Sciences, University of Wisconsin-Madison and poultry specialist, Cooperative Extension Service, University of Wisconsin-Extension.

North Central region Publication Extension No. 216