Common Lice and Mites of Poultry: Identification and Treatment

Common Lice and Mites of Poultry: Identification and Treatment

 
BRIGID MCCREA, Post-Doctoral Employee, Department of Animal Science, UC Davis; JOAN S. JEFFREY, former Extension Poultry Veterinarian, University of California, Davis; RALPH A. ERNST, Extension Poultry Specialist Emeritus, UC Davis; and ALEC C. GERRY, Assistant Veterinary Entomologist and Extension Specialist, UC Riverside.
 
Lice and mites are common poultry pests. They feed on the blood, feathers, skin, or scales of the bird. Heavy infestations can result in poor poultry health, reduced growth and egg production, and even the death of birds. Correct identification of the specific louse or mite pest is important to selecting an appropriate treatment regimen.
 
COMMON POULTRY LICE
Lice are small (mostly between 1 and 6 mm [0.04 to 0.24 in] long), wingless, straw-colored insects with a somewhat flattened appearance and in most cases an elongated abdomen (the hindmost body segment). All poultry lice have chewing mouthparts and feed on dry skin scales, scab tissue, and feather parts. They also feed on blood when the host bird’s skin or feather quills are punctured. Lice are commonly found on both the skin and feathers and can move from one bird to another when birds are kept in close contact. The louse’s eggs (nits) usually are attached to the feathers.
Lice are ectoparasites and spend their entire life on an animal host. Most louse species are host specific, meaning that they can feed on only one or a few closely related species of animal hosts. Poultry lice cannot survive on humans or on our non-bird domestic pets. In fact, a poultry louse generally completes its entire life cycle from egg to adult on a single bird, and will die within a few days to a week if separated from a host. The number of lice on poultry tend to be greatest during the autumn and winter.


Poultry lice are not known to transmit any avian pathogens, although some wild bird lice are suspected of transmitting pathogens to their hosts. The presence of lice frequently accompanies poor poultry health that is attributable to other causes, and is especially harmful to young birds where high numbers of lice may cause sleep disruption. Effective self-grooming of poultry is an important means of reducing lice. Louse populations are generally higher on birds with injured beaks or on those that have had their beaks trimmed. Molting greatly reduces louse populations, and one effective way to address a severe louse problem is to induce molting and then rapidly remove nit-laden feathers from the poultry facility.


The two most common louse species affecting California poultry are the chicken body louse (Menacanthus stramineus) and the shaft louse (Menapon gallinae). Adult chicken body lice measure 3 to 3.5 mm (0.12 to 0.14 in) long while adult shaft lice are about 2 mm (0.08 in) long. Adult chicken body lice are most prevalent around the sparsely feathered vent, breast, and thigh regions. Eggs of the chicken body louse are cemented in clusters to the base of feathers, especially around the vent, while eggs of the shaft louse are cemented individually at the base of the feather shaft or along the feather barb in the breast and thigh regions (Figures 1 and 2). Eggs of both species require 4 to 7 days to hatch and then 10 to 15 days to reach adulthood. An adult louse can lay from 50 to 300 eggs in its 3-week lifespan.


Birds should be checked for lice at least twice a month. Examination involves spreading the bird’s feathers in the vent, breast, and thigh regions to look for egg clusters or feeding adults at the base of the feathers. The presence of some lice on most birds or of egg clusters on one or more birds is enough to indicate the need for treatment. Chemical treatment, if required, should be applied at 10- to 14-day intervals until the lice and nit numbers fall below this level. Louse eggs are resistant to insecticides, so a single insecticide treatment may not be sufficient to provide control. Louse eggs will subsequently hatch when the insecticide is no longer active. By re-treating at 7- to 10-day intervals, you can kill the newly hatched generation that survived the previous chemical treatment before they can grow to adulthood and lay additional eggs.


COMMON POULTRY MITES
Mites, too, are very small (just visible without magnification) and may look like dark, moving specks. Like lice, mites are wingless, but in other aspects their body shape is quite different. Besides being much smaller, mites have a generally rounded body shape and lack any obvious body segmentation. Also, mites are arachnids, not insects, so an adult mite has eight legs while an adult louse (an insect) has only six. Mites are not as host specific as lice and may parasitize many animal species. Mites of some species spend their entire life on a single bird, while others are found on the bird only during active feeding periods and retreat to nearby protected locations after feeding. Like lice, mites generally increase in number during the winter months and decrease in the summer.


Chicken mite (or red poultry mite, Dermanyssus gallinae) is a blood-sucking mite that generally feeds on poultry during the night. During the day these mites may be hiding in areas throughout the poultry house, especially in cracks and crevices of surrounding woodwork, under clods of dirt or manure, or in nests. Their habit of leaving the host after night-time feeding is diagnostic for this mite species. Chicken mites can be red (following a blood meal) to black and can often be found clustered together in the environment surrounding the birds. Usually you have to inspect your birds at night to find them on the skin. Because they need to find daytime hiding places, chicken mites are not generally a pest in cage layer operations, but they can be quite problematic in breeder operations or other situations where fowl are maintained on litter or have nest boxes. Chicken mites have a broad host range and are often associated with a number of wild birds in addition to domestic poultry.
 Fig 1 & 2
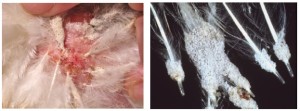
Figures 1 (left) and 2 (right). Egg clusters of the chicken body louse on base of vent feathers. Each egg is less than 1 mm long. Photos by Nancy Hinkle, University of Georgia (Figure 1) and Brad Mullens, UC Riverside (Figure 2).

Washing of Hatching Eggs

Poultry: Reproduction & Incubation

Washing of hatching eggs

The washing of hatching eggs is not recommended although many producers think that visual cleanliness will increase their chances of incubation success. It is more important to stress providing good nesting facilities and frequent egg collection to reduce egg contamination. Cleaning of eggs will then become unnecessary.

The reason that washing is harmful is that washing aides bacteria to penetrate the egg shell through the small egg shell pores. The egg has many natural defences to prevent the bacteria from moving through the shell. Washing removes the egg shell’s natural defences against bacterial entry, and water provides an environment that allows the organisms to literally swim through the shell pores. When this occurs, the egg is overwhelmed by more bacteria than it can destroy and egg contamination results. Several washing aids and antibiotics have been tested to destroy the bacteria but have not consistently improved egg hatchability.

If dirty eggs must be used for hatching, it is recommended that they be incubated in an incubator separate from the clean eggs. This will prevent contamination of clean eggs and chicks if the dirty eggs explode and during hatching.

Source: Mississippi State University Extension Service – This page was last updated on October 14, 2010.

Incubation Fig 4

Care and Incubation of Hatching Eggs

Care and Incubation of Hatching Eggs

By Dr. Tom W. Smith, Emeritus Professor of Poultry Science, Mississippi State University – Novice poultry producers usually become interested in artificial incubation of their own chicks. The success of this type project depends on proper care and incubation of the hatching eggs so healthy, vigorus chicks are produced. The following topics discussed in this publication will help improve the producer’s success.

• Selection of Hatching Eggs
• Egg Care and Storage
• Incubators
• Incubating Conditions
• Sanitation
• Troubleshooting Failures

Selection of Hatching Eggs

Most producers set as many eggs as their breeders produce. If incubator space is the limiting factor, it is more profitable to select the better quality eggs for incubating.

A few tips to follow when selecting hatching eggs are:

• Select eggs from breeders that are (1) well developed, mature and healthy; (2) compatible with their mates and produce a high percentage of fertile eggs; (3) are not disturbed much during the mating season; (4) fed a complete breeder diet; and (5) not directly related [brother, sister, etc.].
• Avoid excessively large or small eggs. Large eggs hatch poorly and small eggs produce small chicks.
• Avoid eggs with cracked or thin shells. These eggs have difficulty retaining moisture needed for proper chick development. Penetration of disease organisms increase in cracked eggs.
• Do not incubate eggs that are excessively misshapen.
• Keep only clean eggs for hatching. Do not wash dirty eggs or wipe eggs clean with a damp cloth. This removes the egg’s protective coating and exposes it to entry of disease organisms. The washing and rubbing action also serves to force disease organisms through the pores of the shell.

Egg Care and Storage

Many times a producer carefully attends to the incubation process but disregards the care of the eggs before they are placed in the incubator. Even before incubation starts the embryo is developing and needs proper care. Hatching eggs suffer from reduced hatchability if the eggs are not cared for properly. Listed below are tips to help maintain hatching egg quality.

• Collect eggs at least three times daily. When daily high temperatures exceed 85 degrees F. increase egg collection to five times daily. Collect two or three times in the morning and one or two times in the afternoon.
• Slightly soiled eggs can be used for hatching purposes without causing hatching problems, but dirty eggs should not be saved. Do not wash dirty eggs.
• Store eggs in a cool-humid storage area. Ideal storage conditions include a 55 degree F. temperature and 75% relative humidity. Store the eggs with the small end pointed downward.
• Alter egg position periodically if not incubating within 4-6 days. Turn the eggs to a new position once daily until placing in the incubator.
• Hatchability holds reasonably well up to seven days, but declines rapidly afterward. Therefore, do not store eggs more than 7 days before incubating. After 3 weeks of storage, hatchability drops to almost zero. Plan ahead and have a regular hatching schedule to avoid storage problems and reduced hatches.
• Allow cool eggs to warm slowly to room temperature before placing in the incubator. Abrupt warming from 55 degrees to 100 degrees causes moisture condensation on the egg shell that leads to disease and reduced hatches.

Incubators

The size and type of incubator selected depends on the needs and future plans of each producer. Many different models are available. For continuous settings, separate incubator and hatcher units are recommended. If all eggs in the unit are at the same stage of incubation, a single unit can be used.

Locate the incubator and hatcher units indoors to protect them from major weather changes. It is essential that the room has a good ventilation system to supply plenty of fresh air. Keeping the units indoors makes it easier to maintain uniform temperature and humidity.

There are basically two types of incubators available, forced-air and still-air incubators. Forced-air incubators have fans that provide internal air circulation. The capacity of these units may be very large. The still-air incubators are usually small without fans for air circulation. Air exchange is attained by the rise and escape of warm, stale air and the entry of cooler fresh air near the base of the incubator. Recommended temperatures vary between the two incubators, so follow the manufacturer’s recommendation that accompany the units.

Incubating Conditions

Poor results are most commonly produced with improper control of temperature and/or humidity. Improper control means that the temperature or humidity is too high or too low for a sufficient length of time that it interferes with the normal growth and development of the embryo. Poor results also occur from improper ventilation, egg turning and sanitation of the machines or eggs. Obtain the best hatch by keeping the temperature at 100 degrees F. throughout the entire incubation period when using a forced-air incubator. Minor fluctuations (less than ½ degree) above or below 100 degrees are tolerated, but do not let the temperatures vary more than a total of 1 degree. Prolonged periods of high or low temperatures will alter hatching success. High temperatures are especially serious. A forced-air incubator that is too warm tends to produce early hatches. One that runs consistently cooler tends to produce late hatches. In both cases the total chicks hatched will be reduced.

Maintain a still-air incubator at 102 degrees F. to compensate for the temperature layering within the incubator. Obtain the proper temperature reading by elevating the bulb of the thermometer to the same height as the top of the eggs when the eggs are laying horizontal. If the eggs are positioned in a vertical position, elevate the thermometer bulb to a point about ¼- to ½-inch below the top of the egg. The temperature is measured at the level where the embryos develop (at the top of the egg). Do not allow the thermometer’s bulb to touch the eggs or incubator. Incorrect readings will result.

Check the thermometer! Is it accurate? An error of one degree for 21 days can seriously interfere with embryonic growth. Check the incubator thermometer’s accuracy by placing the bulb next to the bulb of a clinical (the kind used to measure body temperature) or good laboratory thermometer. Hold both under lukewarm tap water and compare the readings. Compensate for any variation of the incubating thermometer by increasing or decreasing by the amount of variation. A thermometer with a split or gapped mercury column will not give an accurate reading, discard it.
Humidity is carefully controlled to prevent unnecessary loss of egg moisture. The relative humidity in the incubator between setting and three days prior to hatching should remain at 58-60% or 84-86 degree F., wet-bulb. When hatching, the humidity is increased to 65% relative humidity or more.

An excellent method to determine correct humidity is to candle the eggs at various stages of incubation. The normal size of the air cell after 7, 14, and 18 days of incubation for a chicken egg is shown. Necessary humidity adjustments can be made as a result of the candling inspection. The egg’s weight must decrease by 12% during incubation if good hatches are expected.

Incubation Fig 1
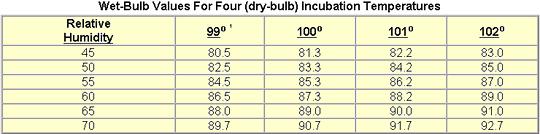
Size of air cell on 7th, 14th and 18th day of incubation

Frequently there is confusion as to how the measurement of humidity is expressed. Most persons in the incubator industry refer to the level of humidity in terms of degrees F., (wet-bulb) rather than percent relative humidity. The two terms are interconvertible and actual humidity depends upon the temperature (F.) as measured with a dry-bulb thermometer. Conversion of the two humidity measurements can be made using the following table:

Incubation Fig 2

1Dry-bulb temperatures are shown horizontally for common incubation values.

Rarely is the humidity too high in properly ventilated still-air incubators. The water pan area should be equivalent to one-half the floor surface area or more. Increased ventilation during the last few days of incubation and hatching may necessitate the addition of another pan of water or a wet sponge. Humidity is maintained by increasing the exposed water surface area.

Ventilation is very important during the incubation process. While the embryo is developing, oxygen enters the egg through the shell and carbon dioxide escapes in the same manner. As the chicks hatch, they require an increased supply of fresh oxygen. As embryos grow, the air vent openings are gradually opened to satisfy increased embryonic oxygen demand. Care must be taken to maintain humidity during the hatching period. Unobstructed ventilation holes, both above and below the eggs, are essential for proper air exchange.

What must be done if the power goes off during incubation? A proper response depends on several factors, some of which include the temperature of the room in which the incubator is located, the number of eggs in the machine, and whether the eggs are in the early or late stage of incubation.

The two most important considerations in this situation are to (1) keep the eggs from overheating and (2) be sure they have an adequate oxygen supply. The longer the eggs incubate and the greater the number of eggs in the incubator, the greater the chance that you will experience overheating and suffocation of the embryos.

If the room in which the incubator is located is hot and stuffy, you will have to react more quickly to power outages than if the room is kept at 75 degrees and is well ventilated. The most effective guard against overheating and suffocation is to open the door of the incubator or hatcher. Whether the door is opened slightly or fully and the length of time it is left open depends on the factors mentioned earlier.

Eggs must be turned at least 4-6 times daily during the incubation period. Do not turn eggs during the last three days before hatching. The embryos are moving into hatching position and need no turning. Keep the incubator closed during hatching to maintain proper temperature and humidity. The air vents should be almost fully open during the latter stages of hatching.

The eggs are initially set in the incubator with the large end up or horizontally with the large end slightly elevated. This enables the embryo to remain oriented in a proper position for hatching. Never set eggs with the small end upward.

In a still-air incubator, where the eggs are turned by hand, it may be helpful to place an “X” on one side of each egg and an “O” on the other side, using a pencil. This serves as an aide to determine whether all eggs are turned. When turning, be sure your hands are free of all greasy or dusty substances. Eggs soiled with oils suffer from reduced hatchability. Take extra precautions when turning eggs during the first week of incubation. The developing embryos have delicate blood vessels that rupture easily when severely jarred or shaken, thus killing the embryo. The following table lists incubation requirements for various species of fowl.

Incubation Fig 3


1 Measured at degrees F. in a forced-air incubator. For still-air incubators, add 2-3 degrees F.
2 Measured as degrees F. using a wet-bulb thermometer. Use chart to convert to relative humidity.

Sanitation

In large commercial incubators, eggs of different ages are often set and each setting transferred to a separate unit prior to hatching. Separate hatching units permit proper sanitation and disease control measures to be practiced between batches of chicks. The chicks can be hatched without disturbing the other incubating eggs. Thoroughly clean and disinfect the incubator and hatcher before each usage. Remove all egg shells, down, dust, and extra material with a broom or vacuum. Wash the unit with a warm detergent solution and rinse with a disinfectant solution. When dry, turn the units on and bring to proper temperature and humidity conditions prior to filling with eggs.

A thorough cleaning job results in a 95-99% improvement in disease control. When done properly, little or no disinfectant is needed. If a disinfectant is used, quaternary ammonia is the most commonly used disinfectant for equipment like incubators and hatching trays. “Quats” are relatively non-irritating, non-corrosive, of low toxicity, and is reasonably effective in the presence of organic matter. Since the incubator and its components should be clean and free of organic matter before disinfectant application, quats are a good choice.

Fumigation is another tool for disease control and is something good to turn to when either the cleaning is poor, eggs are dirty, or machines are filled with eggs and it is difficult to empty and clean properly. The fumigation process can be hazardous to the producer if not conducted carefully. Contact the Poultry Extension Department at Mississippi State University or your local County Agent’s office for additional information on properly fumigating incubators and hatching eggs.

Trouble Shooting Failures

The novice poultry producer will usually encounter problems when incubating the first batches of eggs. Fortunately, causes for most failures can be diagnosed and corrected. A separate diagnosis chart has been prepared to assist in solving incubation failures. Refer to this chart at http://www.msstate.edu/dept/poultry/trouble.htm.

Additional information on poultry production can be obtained by contacting the Poultry Extension Department, Box 9665, Mississippi State, MS 39762 – (662) 325-2853.
Good Luck with your egg hatching project.
Source: Mississippi State University Extension Service – May 2004

Incubation Fig 4